 There are many ways to build a natural terrarium, it can be jungle – or it could be desert. It could have a soil drainage system in levels – or it could have a false floor and be a paludarium style for fish as well as reptiles and amphibians. There are manufacturers that provide even more variety in methods, BioPod for example provided a full and complete system – Zoo Med provide a range of products to make paludarium building much easier. Further confusion – do you want an automated rain system? Or are you planning on spraying manually? What about light choices? It’s an almost mind boggling array of options and paths for the hobbyist to take.
Here is just one option, starting at the basics – actually constructing the bare bones of your terrarium. We will cover some further options as we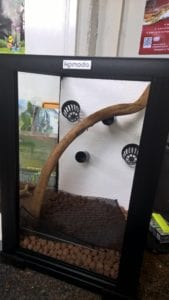 discuss the build.
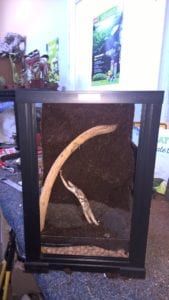
There are many glass terraria on the market right now from most of the major manufacturers such as Exo Terra and Zoo Med. Whichever brand you choose just make sure it is watertight when building a jungle terrarium. Firstly, concentrate on the backwall as this is pretty much going to be your focal point as well as providing hiding and stimulus for your animals. The initial process is completely a thought process, getting an idea in your head of how you want your terrarium to look. Imagine where the plants will need to be, perhaps a branch or two and maybe a hiding area. I have constructed backwalls with expanding foam (don’t use a foam with fire retardant), and I have also constructed them using polystyrene sheet and packing – I have even used a hybrid of the two. 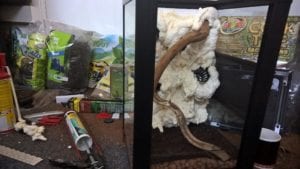 Lay the terrarium on its back, take out the glass doors if you can (if they are hinged support the doors to stop them breaking their hinges). Use some aquarium grade silicone to stick polystyrene sheets to the glass, or spray the expanding foam directly onto the glass. Keep in mind not to cover the back of the terrarium where the soil or false floor will be – this needs to be bare glass. Remember when using expanding foam, and the clue is in the name, it will expand dramatically. I always use less than I think the display will need, it can be carved once dry – but seems more sensible to add a little more than take away. As a word of warning I have had glass tanks crack when using expanding foam, perhaps a hybrid of a thin sheet of polystyrene and a conservative layer of expanding foam on top
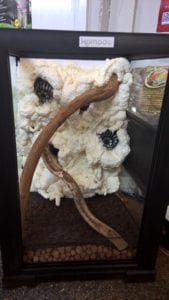 may help avoid this problem. Don’t forget to include little areas where plants can be planted (I often use old plastic plant pots with extra drainage) and of course any other décor such as branches. Leave it all to set and dry, keeping the terrarium on its back during this process. Carve out the back wall as required to make the image you have imagined in your head. You may need to carve out your planting areas. Next this needs to be sealed, a good way of doing this is tile grout (without mould resistance) as it provides a hard finish. Cover the expanding foam with the grout, meeting up with the glass. Any gaps will allow moisture in and even perhaps livefood such as mealworms to damage the expanding foam underneath. Once dry apply, in small areas, a thick layer of brown aquarium grade silicone. Whilst the silicone is still wet, and with the terrarium still on its back, cover it with a thick layer of coir. Once completely dry and smell free the backwall is ready for planting. But not just yet.
 Now it’s time to start on the floor. Time to turn the terrarium the correct way up now. There are two deviations here, simplest is soil with drainage layer, more advanced is a false floor that can also be a paludarium. Firstly the easy way. Pour a layer of clay balls, such as Lucky Reptiles Hydro Balls, to a depth of around an inch into the bottom of the terrarium. Next use a plant membrane such as Lucky Reptiles Hydro Fleece to cover the balls. Then a layer, around three to four inches, of a soil based material such as ProRep BioLife Forest that is designed for use in terraria. At this point, with the backwall covered in coir, the terrarium is starting to look the part. Now, for the second, slightly more complicated way with a false floor. You will need to cut a piece of ‘egg crate’ plastic mesh sheet to the size of the internals of the terrarium, minus an area to become a water feature at the front. Some builders do half land, half water. Cut some plastic pipe, the type used for kitchen sink drains, to the depth of the water required, maybe four to six inches. Stand the sheet of egg crate on the cut pipes to create something that resembles a table inside the terrarium – this creates a void under the egg crate. This void, once full of water, is normally used to create a paludarium where fish can be kept. This can be left fully open, so you can see under the false floor, or if you want to create a pond bank effect, you can use a special peat brick (not the ones sold as substrate) to build under the void. Most builders use pebbles and gravel on the floor of this new water area. For the newly created floor area, on top of the egg crate mesh, apply a layer of plant membrane as used for the
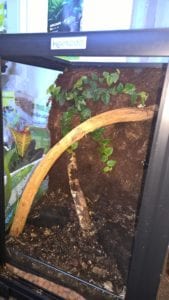 drainage layer in the previous method. Next pour an inch layer of clay balls, another layer of membrane, with a wall of the solid peat bricks to stop it pouring over the front edge of the egg crate. A much easier method to create this kind of false floor is Zoo Med Paludarium Platforms, that incidentally fit perfectly in Zoo Med glass paludariums.
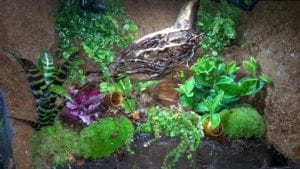
With either a traditional drainage layer design, or a false floor design, it’s now ready to plant up your terrarium and make it look pretty. Choose only plants that are 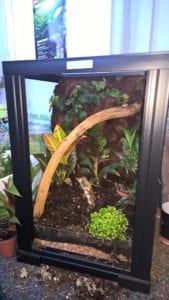 from reptile shops, many plants from nurseries and supermarkets have harmful additives you don’t want in your terrarium. Plant trailing plants such as Ficus pumilla in the back wall, in the plant areas you have created. You can train this kind of plant to grow where you like by using plant pins and wires – it can lead to a branch for example. Bromelia need to be planted into a moss ‘package’, then fastened with wire to the branches. Upright and bushy plants can be planted in the floor soil, tall ones at the back and small bushy ones at the front. Moss can be encouraged to grow on the backwall, branches and also the floor – choose your mosses for the purpose you need, research as necessary. Further useful items that are also decorative can now be added. A layer of leaf litter, oak is ideal, can be layered on top of the soil. Seed pods and more exotic larger tropical leaves can be added. All this looks great, provides hides, and eventually rots and adds to the balance of the eco-terrarium. Remember you are creating a slice of the natural world. Finally, before adding your animals establish your clean-up crew – this includes Springtails and woodlice. These little critters will deal with the bulk of the waste matter produced by the animals, of course leaving some for plant food too – a proper little balance.
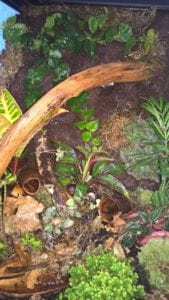
This article has concentrated on setting up the terrarium, the build itself. Don’t forget you will need to add some essential electrical items such as lights for the plants. Then there are several other electrical goodies that will add to your terrarium. Either in animal well-being, general convenience or looks. This includes misting systems and pumps for waterfalls. You will need to read our accompany blog for further details!